Usually a malware writer, or a closed source product, use some techniques in order to make the binaries difficult to read. In one hand, the anti-virus are unable to read the signature of the malware and on the other, a reverse engineer’s life becomes difficult. One technique (usually not implemented alone), is to encrypt some portions of the code and decrypt them at runtime, or better decrypt each time the code we want to run and then encrypt it back. As GPU’s have extremely high computational power, we can have really complex functions for encrypting and decrypting our code. I’ve made a really simple example of a self-decrypting application and i’ll try to explain this step by step.
So, what is our program going to do? Well it will spawn a shell. The assembly code (we need assembly code so it can be portable) to do that is:
global _shell

_shell:
xor ecx, ecx
mul ecx
push ecx
push 0x68732f2f
push 0x6e69622f
mov ebx, esp
mov al, 11
int 0x80
You can find codes like this freely available on the internet (this one is written by kernel panik), or you can make your own if you want specific things to be done (or just want to learn). We want our code to be portable, and not containing relative addresses.
Now that we have our assembly code, we compile it to an object file:
nasm shell.asm -f elf32 -o shell.oThen, we have to write code for the self-decrypting binary. A simple example can be found below, written in C for CUDA:
#include <stdio.h>
#include <sys/mman.h>
#include <cuda.h>

#define len 21

__global__ void decrypt(unsigned char *code){

int indx = threadIdx.x;
code[indx] ^= 12;

}

extern "C" void _shell();

int main(void){

unsigned char *p = (unsigned char*)_shell;
unsigned char *d_shell,*h_shell;

h_shell = (unsigned char *)malloc(sizeof(char)*len);

int i;
for(i=0;i<len;i++){
h_shell[i] = *p;
p++;
}
cudaMalloc((void **) &d_shell, sizeof(char)*len);
cudaMemcpy(d_shell, h_shell, sizeof(char)*len, cudaMemcpyHostToDevice);
decrypt<<<1,len>>>(d_shell);
cudaMemcpy(h_shell, d_shell, sizeof(char)*len, cudaMemcpyDeviceToHost);
cudaFree(d_shell);
char *d=(char *)mmap(NULL, len,PROT_READ|PROT_WRITE|PROT_EXEC, MAP_PRIVATE|MAP_ANON,-1,0);

memcpy(d,h_shell,len);

((void(*)(void))d)();
}
Now let’s explain some things. First of all we have to find the length of the instructions. There a few ways to do this and I choose this project by oblique here: https://github.com/oblique/insn_len that can do that very easily.
Now, some of you may wonder why I am mmaping and memcpying. Well there are some protections around, that prevent us from writing to some portions of memory such as .text. So we have to load our encrypted code, decrypt it and mmap it to a new portion of memory that can be executed. This is where our flags go. After that we are ready to execute our code.
In our example we use a simple xor decryption with a fixed key, but you can have a more complex stream cipher function like RC4 ect. Also you do not need to have a key saved in the binary, but brute force it until the code “makes sense”. With such a computation power it is pretty easy.
Now we compile our source code with nvcc and link it:
nvcc shell_spawn.cu -c
gcc shell_spawn.o shell.o -o shell_spawn -L/usr/local/cuda/lib -lcudart
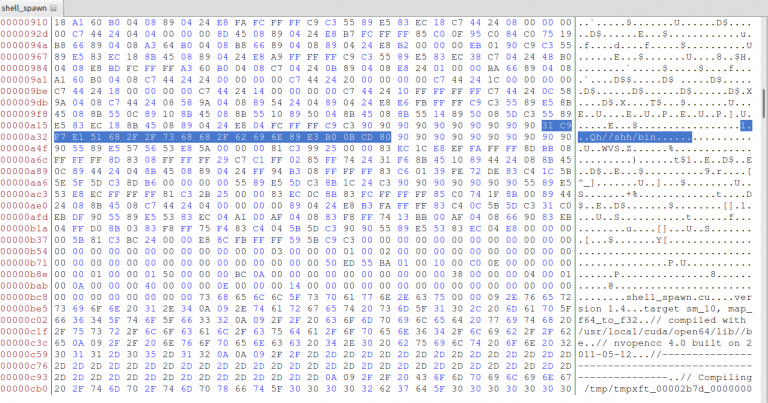
And now we have our executable! But first we have to patch our binary with our encrypted function. The reason why we used stream ciphers is because we don not want to change the size of our function, and make things more complex. One simple way to patch our elf binary is simply by opening it with a hex editor ( i used Bless), and find the code we want to patch. But how? It’s simple:
objdump -d -j .text shell_spawnand if you search you will see the _shell function:
8048a30:    31 c9                  xor    %ecx,%ecx
8048a32:    f7 e1                  mul    %ecx
8048a34:    51                     push   %ecx
8048a35:    68 2f 2f 73 68         push   $0x68732f2f
8048a3a:    68 2f 62 69 6e         push   $0x6e69622f
8048a3f:    89 e3                  mov    %esp,%ebx
8048a41:    b0 0b                  mov    $0xb,%al
8048a43:    cd 80                  int    $0x80
Now we simply encrypt the op codes. I used xor 12 so my output is this:
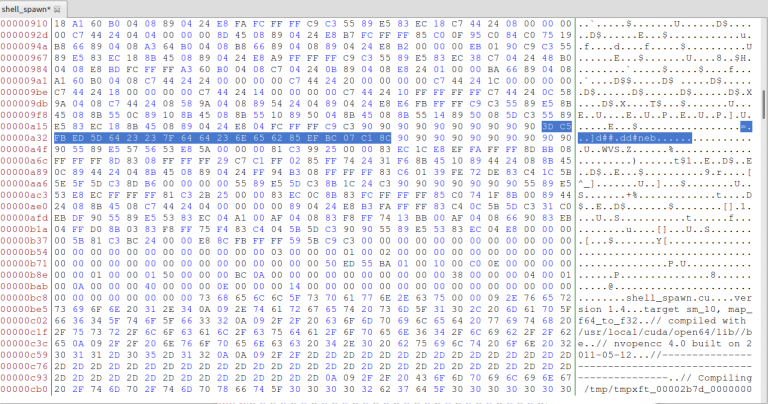
3dc5fbed5d6423237f6464236e656285efbc07c18cWe open our hex editor, load our binary and replace our old _shell function with our encrypted one:


After that we save our file and if we execute it we can see that a shell spawns! If we objdump our file, we can see our function _shell, but this time is doing random stuff:
8048a30:    3d c5 fb ed 5d  cmp  $0x5dedfbc5,%eax
8048a35:    64 23 23        and  %fs:(%ebx),%esp
8048a38:    7f 64           jg 8048a9e <__libc_csu_init+0x4e>
8048a3a:    64 23 6e 65     and %fs:0x65(%esi),%ebp
8048a3e:    62 85 ef bc 07 c1   bound  %eax,-0x3ef84311(%ebp)
8048a44:    8c 90 90 90 90 90    mov    %ss,-0x6f6f6f70(%eax)
You can find my source also on github here: https://github.com/mpekatsoula/gpu_ad
I want to develop a strong cipher and find a better way to patch my binary, so this is just the idea. If someone wants to go deeper i’d like to hear new ideas. Until then, feel free to comment, point mistakes etc