Recently I created a few VPN access points using my home connection(s) (2 remote geo points) with the aim to use them for unblocking content and hiding my real location. One of the requirements was to use the VPNs without having to install a VPN client on any wireless enabled device while I’m at home. After some quick research, I came across WireGuard project and I decided to give it a go using some raspberry pi’s I had lying around and document my process.
Setting up a WireGuard server of the raspberry pi is quite easy using the PiVPN project. Since I wanted to create separate networks I chose a different port on each raspberry pi and a different configuration name to make them easier to distinguish. Port forwarding for UDP/TCP was necessary. For getting my connection’s public IP, I installed ddclient and bought a domain name on namecheap for easier access to my devices. Instructions on how to setup ddclient with namecheap can be found here. Here is a quick guide for installing and configuring:
sudo apt-get install ddclient libio-socket-ssl-perl

# These should be the contents of ddclient.conf
cat /etc/ddclient.conf
    ssl=yes
    use=web, web=dynamicdns.park-your-domain.com/getip
    protocol=namecheap
    server=dynamicdns.park-your-domain.com
    login=<YOUR DOMAIN>
    password=<Dynamic DNS Password>
Hostname

sudo ddclient -query
sudo service ddclient restart
Finally, I made the raspberry pi act as a wireless access point and forwarded the traffic to my wireguard client. This way, whenever a device is connected to the raspberry pi AP it will automatically use the WireGuard connection without the device having any knowledge whatsoever. Steps to setup your raspberry pi as an AP (full tutorial here):
sudo apt-get install hostapd
sudo apt-get install dnsmasq
sudo systemctl stop hostapd
sudo systemctl stop dnsmasq

sudo vim /etc/dhcpcd.conf
    interface wlan0
    static ip_address=192.168.2.10/24
    denyinterfaces eth0
    denyinterfaces wlan0

sudo mv /etc/dnsmasq.conf /etc/dnsmasq.conf.orig
sudo vim /etc/dnsmasq.conf
    interface=wlan0
    dhcp-range=192.168.2.11,192.168.2.30,255.255.255.0,24h

sudo vim /etc/hostapd/hostapd.conf
    country_code=GB
    interface=wlan0
    ssid=RASPIGB
    hw_mode=a
    channel=36
    macaddr_acl=0
    auth_algs=1
    ignore_broadcast_ssid=0
    wpa=2
    wpa_passphrase=<PWD>
    wpa_key_mgmt=WPA-PSK
    wpa_pairwise=TKIP
    rsn_pairwise=CCMP

sudo vim /etc/default/hostapd
    DAEMON_CONF="/etc/hostapd/hostapd.conf"

sudo vim /etc/sysctl.conf
    net.ipv4.ip_forward=1

sudo systemctl start hostapd
sudo systemctl start dnsmasq
Below is one of the WireGuard configuration files:
# cat /etc/wireguard/wg1.conf
[Interface]
Address = 10.0.2.1/24
ListenPort = 51821
PostUp = iptables -A FORWARD -i wg1 -j ACCEPT; iptables -t nat -A POSTROUTING\
 -o eth0 -j MASQUERADE
PostUp = iptables -A FORWARD -i wlan0 -j ACCEPT; iptables -t nat -A POSTROUTING\
 -o wg2 -j MASQUERADE
PostDown = iptables -D FORWARD -i wg1 -j ACCEPT; iptables -t nat -D POSTROUTING\
 -o eth0 -j MASQUERADE
PostDown = iptables -D FORWARD -i wlan0 -j ACCEPT; iptables -t nat -D POSTROUTING\
 -o wg2 -j MASQUERADE
PrivateKey = <REDACTED>
DNS = 1.1.1.1, 1.0.0.1

# Phone peer
[Peer]
PublicKey = <REDACTED>
PresharedKey = <REDACTED>
AllowedIPs = 10.0.2.2/32
PersistentKeepalive = 25
Notice that wlan0 traffic will be forwarded to wg2, which in this case is the server on the 2nd raspberry pi.
After repeating the same process for both raspberry pis, I also setup a WireGuard server on Linode, as I wanted to have an extra, faster, cloud based VPN available that I could used while I’m on 4G/5G. The final architecture can be seen in the image below.
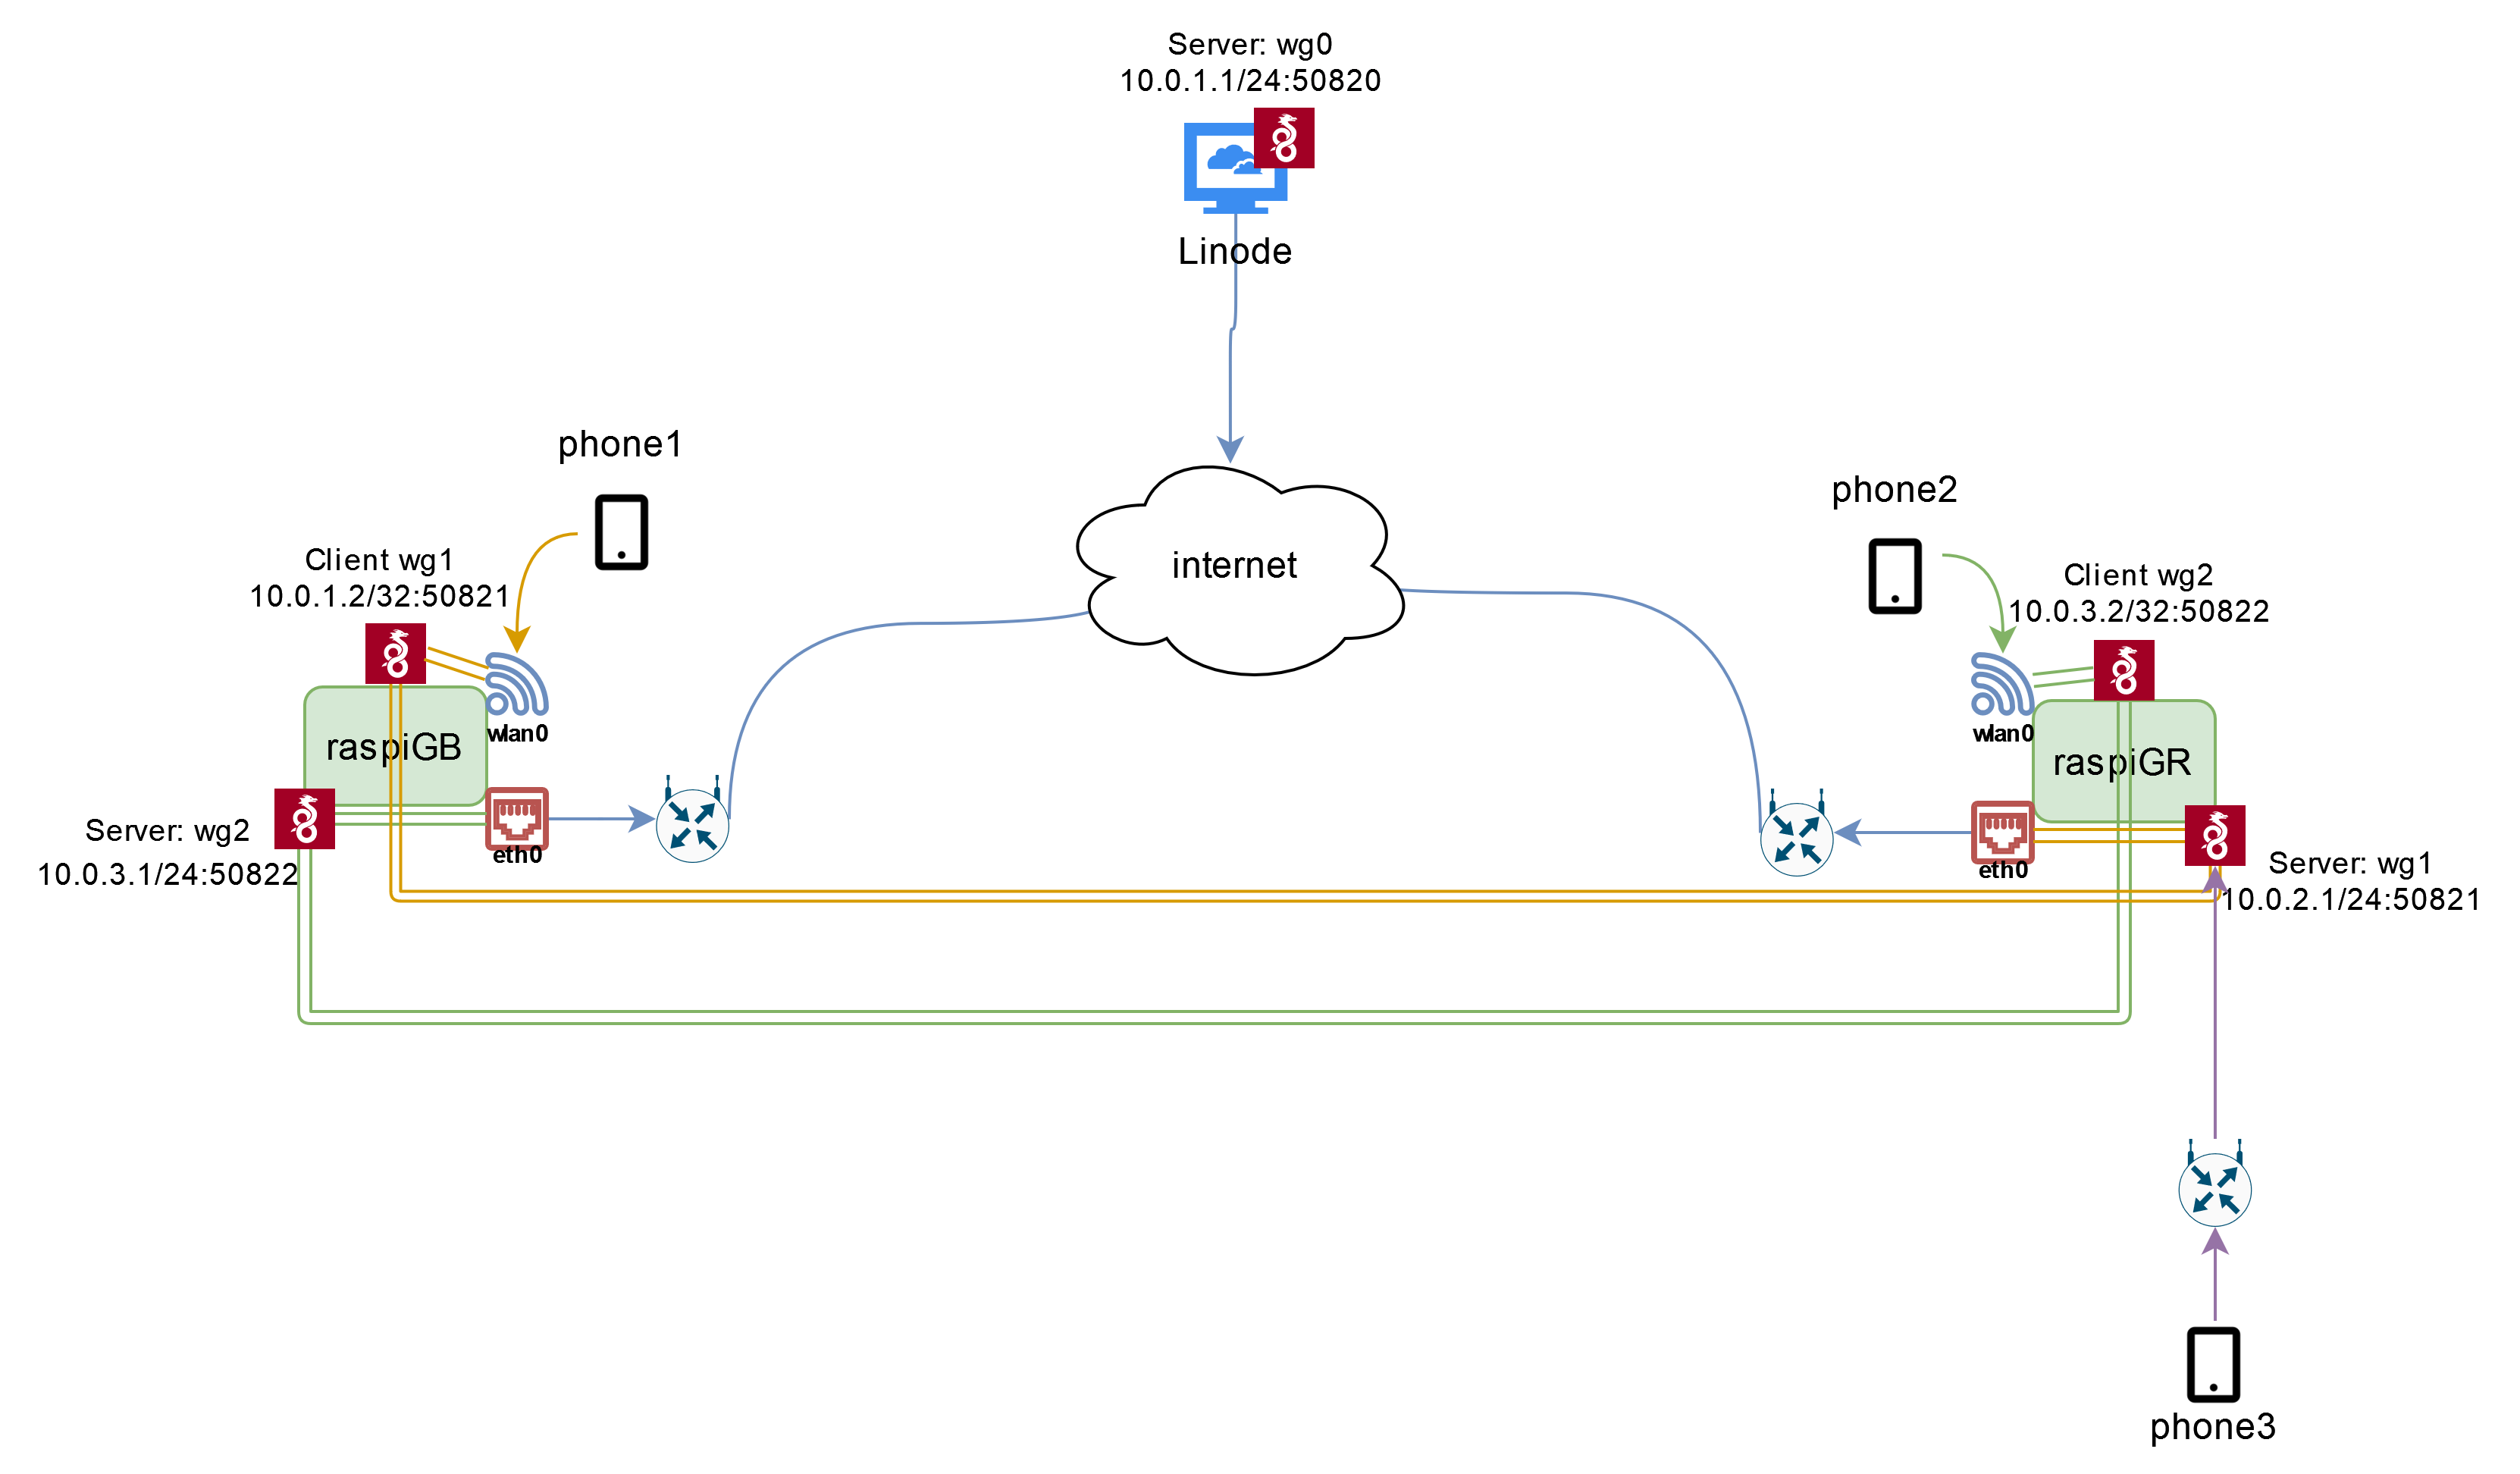
Let’s take as example phone 1 which is located in the UK: once the phone is connected to the WiFi AP of raspiGB, all of it’s traffic will be routed through wg1 to raspiGR and use a Greek IP. The same applies for phone 2. We can of course re-route the traffic to wg0 or to any other WireGuard server that we might have set up. Finally, a device with the WireGuard client installed, can access whichever server it wants as shown with phone 3.